What Is the Process of Waterproofing? A Complete Step-by-Step Guide
Every home tells a story — of comfort, safety, and lasting strength. But behind every strong home lies one critical decision that most homeowners overlook until it is too late: waterproofing. Whether you are building a new home or maintaining an existing one, understanding the process of waterproofing is essential. Water damage is one of the most common and expensive problems in construction, and a well-executed waterproofing system is your first and strongest line of defense. At GK Home Construction, we believe every homeowner deserves to understand what goes into protecting their property, so let us walk you through the complete waterproofing process from start to finish.
Why Waterproofing Matters More Than You Think
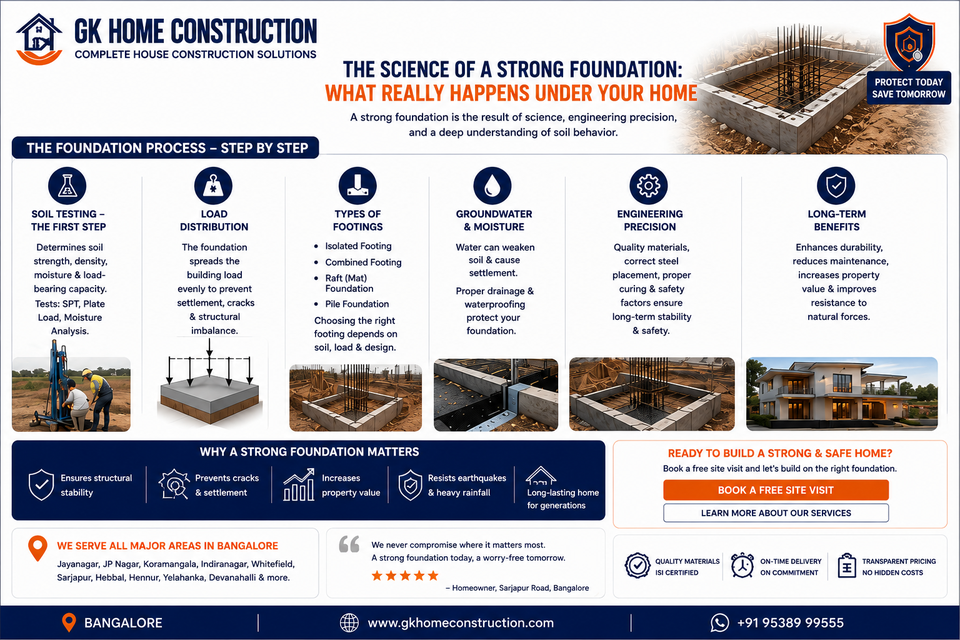
Before diving into the process, it is important to understand why waterproofing is not just an optional add-on — it is a necessity. Water seepage and moisture infiltration can silently damage a building's foundation, walls, and roof over years without visible signs until serious structural harm has occurred. Damp walls lead to mold growth, which poses significant health risks to the occupants. Moisture in basements and foundations weakens the concrete and steel reinforcement over time, leading to cracks, settling, and in severe cases, structural failure. Waterproofing protects your investment, preserves the integrity of the structure, and ensures a safe and healthy living environment for your family.
Step 1 — Site Inspection and Assessment
The waterproofing process always begins with a thorough inspection of the structure. A trained waterproofing expert evaluates the entire property to identify vulnerable areas — these typically include the roof, basement, terrace, bathrooms, external walls, and areas around water pipes and drainage systems. The inspection helps determine the severity of existing water damage, the type of moisture problem (seepage, leakage, or rising dampness), and the most appropriate waterproofing solution for that specific structure. No two buildings are identical, which is why a customized approach based on an on-site assessment always produces better and more durable results than a generic one-size-fits-all solution.
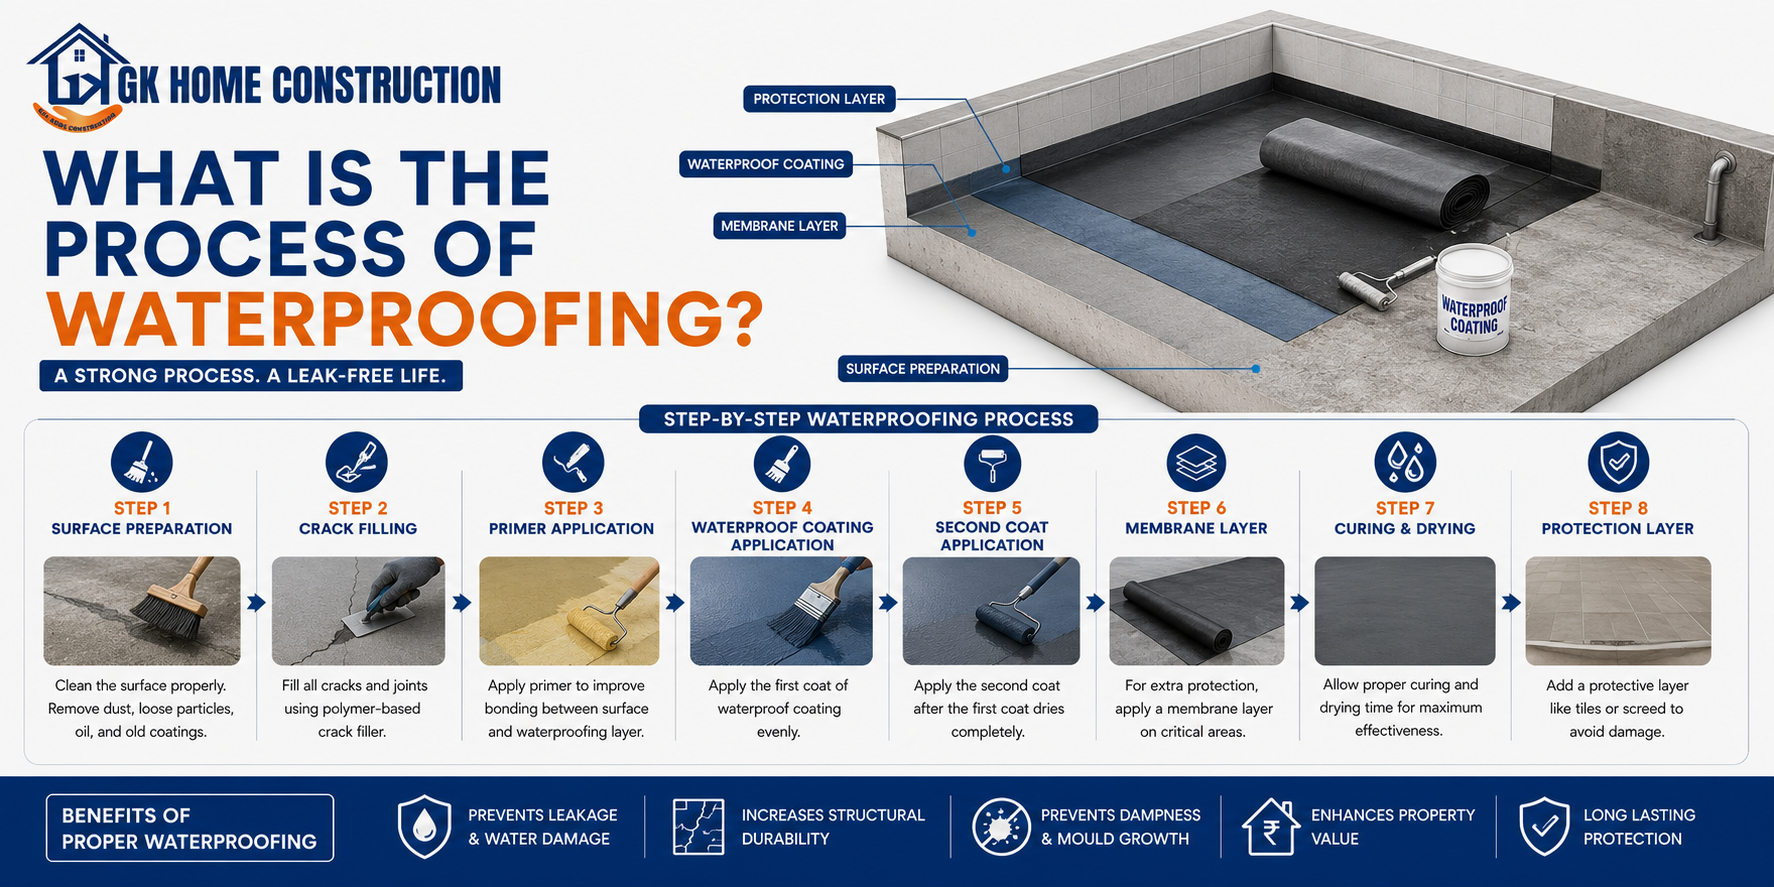
Step 2 — Surface Preparation
Surface preparation is arguably the most critical phase in the entire waterproofing process. Even the best waterproofing material will fail if it is applied to a poorly prepared surface. In this stage, the surface to be treated is thoroughly cleaned to remove all dust, dirt, oil, loose paint, and existing debris. Any existing cracks, honeycombs, or cavities in the concrete are repaired using appropriate crack fillers or cement-based repair mortars. If the surface has old waterproofing layers that are deteriorated or peeling, they are completely removed. The surface must be structurally sound, clean, and slightly damp (but not wet) before any waterproofing product is applied. Cutting corners at this stage is the most common reason waterproofing treatments fail prematurely.
Step 3 — Choosing the Right Waterproofing System
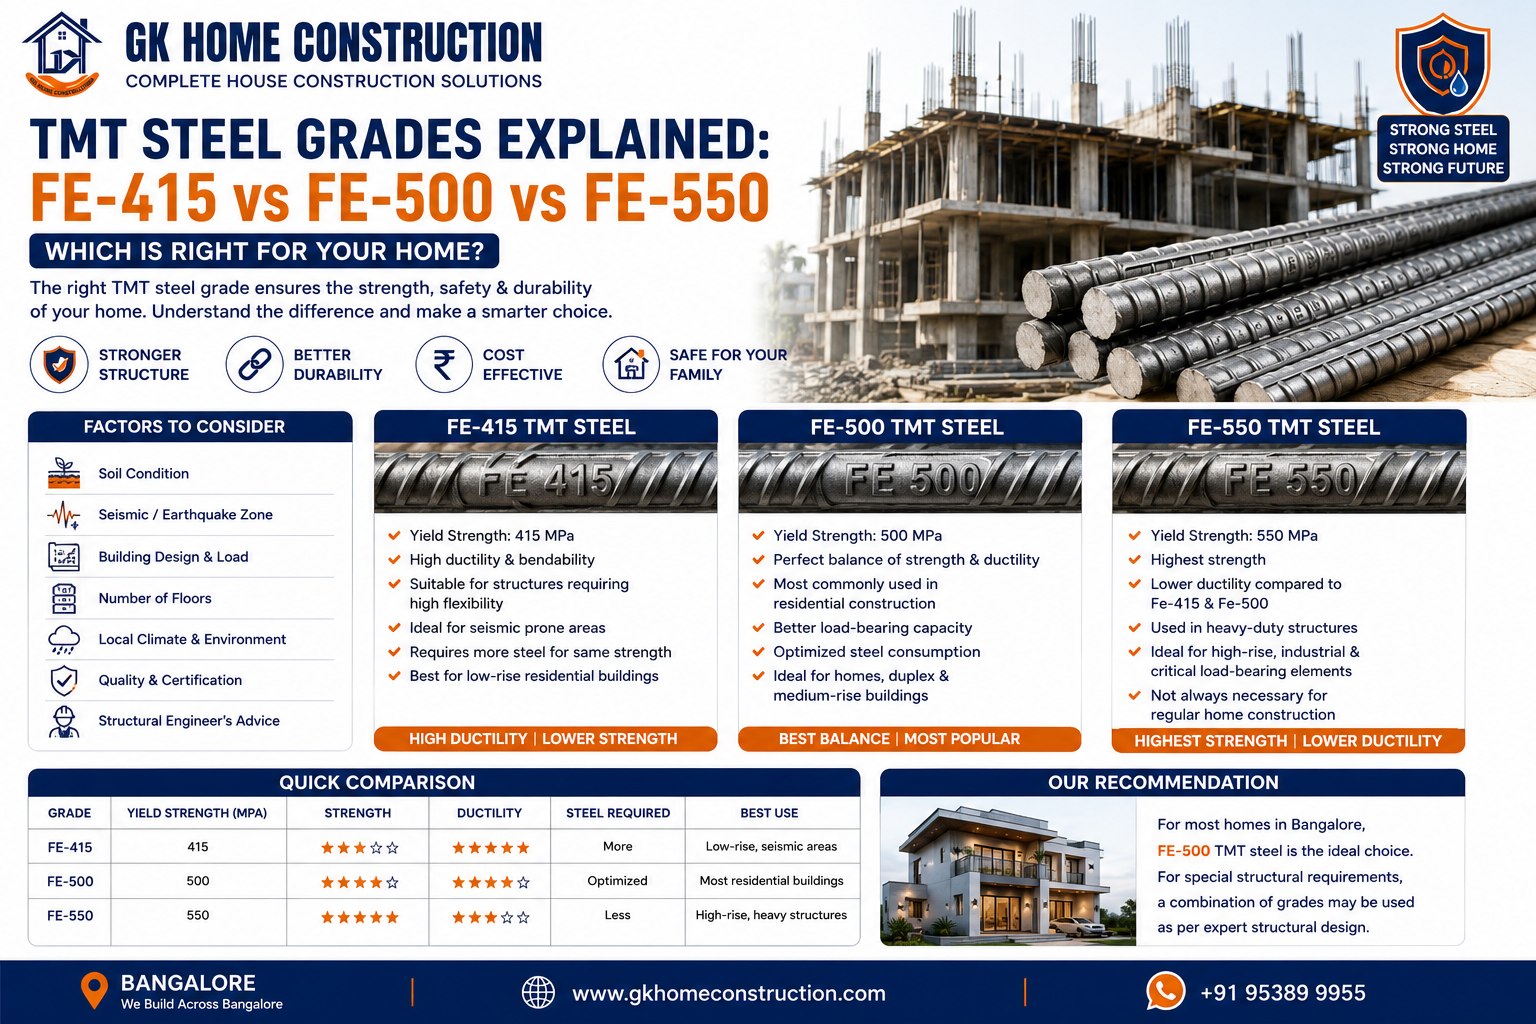
There are several types of waterproofing systems available, and selecting the right one depends on the area being treated, the type of structure, water pressure levels, and the client's budget. Cementitious waterproofing is one of the most commonly used methods for internal wet areas such as bathrooms, kitchens, and water tanks. It is easy to apply and relatively affordable. Liquid membrane waterproofing involves applying a liquid coating that cures into a flexible, seamless membrane — this is ideal for terraces, roofs, and external walls. Bituminous membrane waterproofing, also known as asphalt waterproofing, is commonly used for flat roofs and foundation areas due to its excellent waterproof properties and durability. Polyurethane liquid membrane systems are used in areas exposed to extreme weather as they offer high elasticity and UV resistance. At GK Home Construction, we evaluate every project individually and recommend the most effective system based on site-specific requirements.
Step 4 — Application of the Waterproofing Treatment
Once the surface is prepared and the right waterproofing system is selected, the actual application process begins. This phase varies slightly depending on the type of system being used. For liquid-applied membranes, the product is applied in multiple coats using rollers, brushes, or spray equipment. Each coat is allowed to cure fully before the next coat is applied — this layering approach ensures complete coverage and eliminates pinholes or weak spots. For membrane sheets or bituminous systems, the sheets are carefully laid and heat-bonded or adhesive-bonded to the surface, with overlapping joints sealed to prevent any gap. Corners, edges, pipe penetrations, and construction joints receive extra attention as these are the most common entry points for water. A professional waterproofing team ensures uniform thickness across the entire treated area, which is crucial for consistent performance over time.
Step 5 — Protection Layer and Finishing
After the waterproofing membrane has fully cured, a protective layer is often applied over it to prevent physical damage during subsequent construction activities. For terrace and roof areas, a screed layer or protective board is placed over the membrane before tiling or flooring is done. This protection ensures that the waterproofing layer is not punctured or damaged by foot traffic or the weight of finishing materials. In basement and foundation areas, drainage boards or geo-textile fabrics may be used to direct water away from the waterproofed surface. This finishing stage ensures that the waterproofing system remains intact and functional for its intended lifespan.
Step 6 — Testing and Quality Check
A responsible waterproofing contractor never considers the job complete without rigorous testing. The most common test used is the flood test or ponding test, where the treated surface is flooded with water and left for 24 to 48 hours to check for any seepage or leakage. This simple but highly effective test verifies the integrity of the waterproofing system before the final finishing layers are applied. Any areas where seepage is detected are treated again and retested until a perfectly watertight result is achieved. Quality assurance at this stage saves considerable time, cost, and inconvenience later.
Invest in Waterproofing Today, Protect Your Home for Decades
Waterproofing is not an expense — it is a long-term investment in the safety, durability, and value of your property. When done correctly by experienced professionals, a good waterproofing system can last anywhere between 10 to 25 years depending on the type of system and site conditions. At GK Home Construction, we bring expertise, quality materials, and attention to detail to every waterproofing project we handle. Whether you are constructing a new home, renovating an existing one, or dealing with water seepage issues, our team is ready to provide reliable, long-lasting waterproofing solutions tailored specifically to your needs. Protect your home from water damage before it becomes a costly problem — because when it comes to waterproofing, prevention will always be far better than cure.