Bathroom Waterproofing Process: A Complete Step-by-Step Guide
Water damage is one of the most expensive and frustrating problems a homeowner can face, and bathrooms are the number one source of moisture-related issues in any residential or commercial property. Without proper waterproofing, even the most beautifully designed bathroom can become a breeding ground for mould, structural decay, and costly repairs within just a few years. At GK Home Construction, we believe that waterproofing is not an afterthought — it is the very foundation of a long-lasting, healthy bathroom. This comprehensive guide walks you through the complete bathroom waterproofing process, step by step, so you understand exactly what it takes to protect your space the right way.
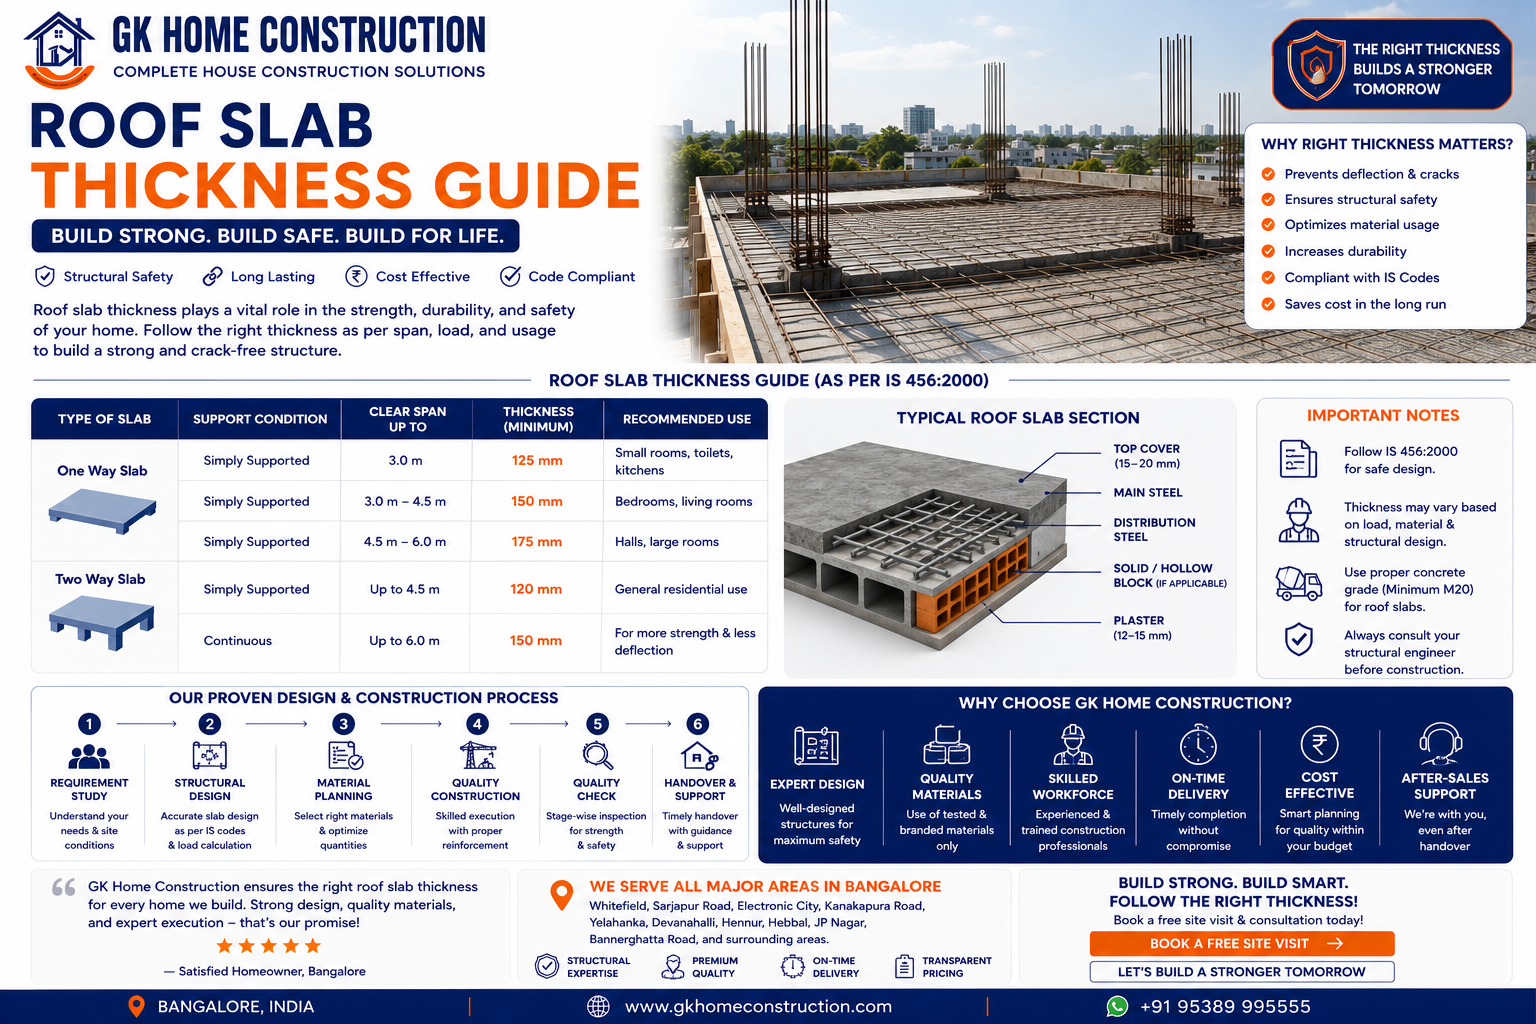
Step 1: Understanding Why Bathroom Waterproofing Matters
Before we dive into the process, it is important to understand what waterproofing actually protects against. Bathrooms are exposed to continuous cycles of moisture — from daily showers and baths to steam and humidity that builds up over time. This constant moisture, if left unmanaged, seeps into walls, floors, and structural substrates, weakening the building materials beneath the surface. The visible effects, such as peeling paint or cracked tiles, are only the tip of the iceberg. Behind the scenes, water can corrode steel reinforcements, rot timber frames, and create conditions where dangerous black mould thrives. Waterproofing creates a physical barrier that stops water from penetrating beyond the surface layer, preserving the structural integrity of your home and ensuring the safety of your family.
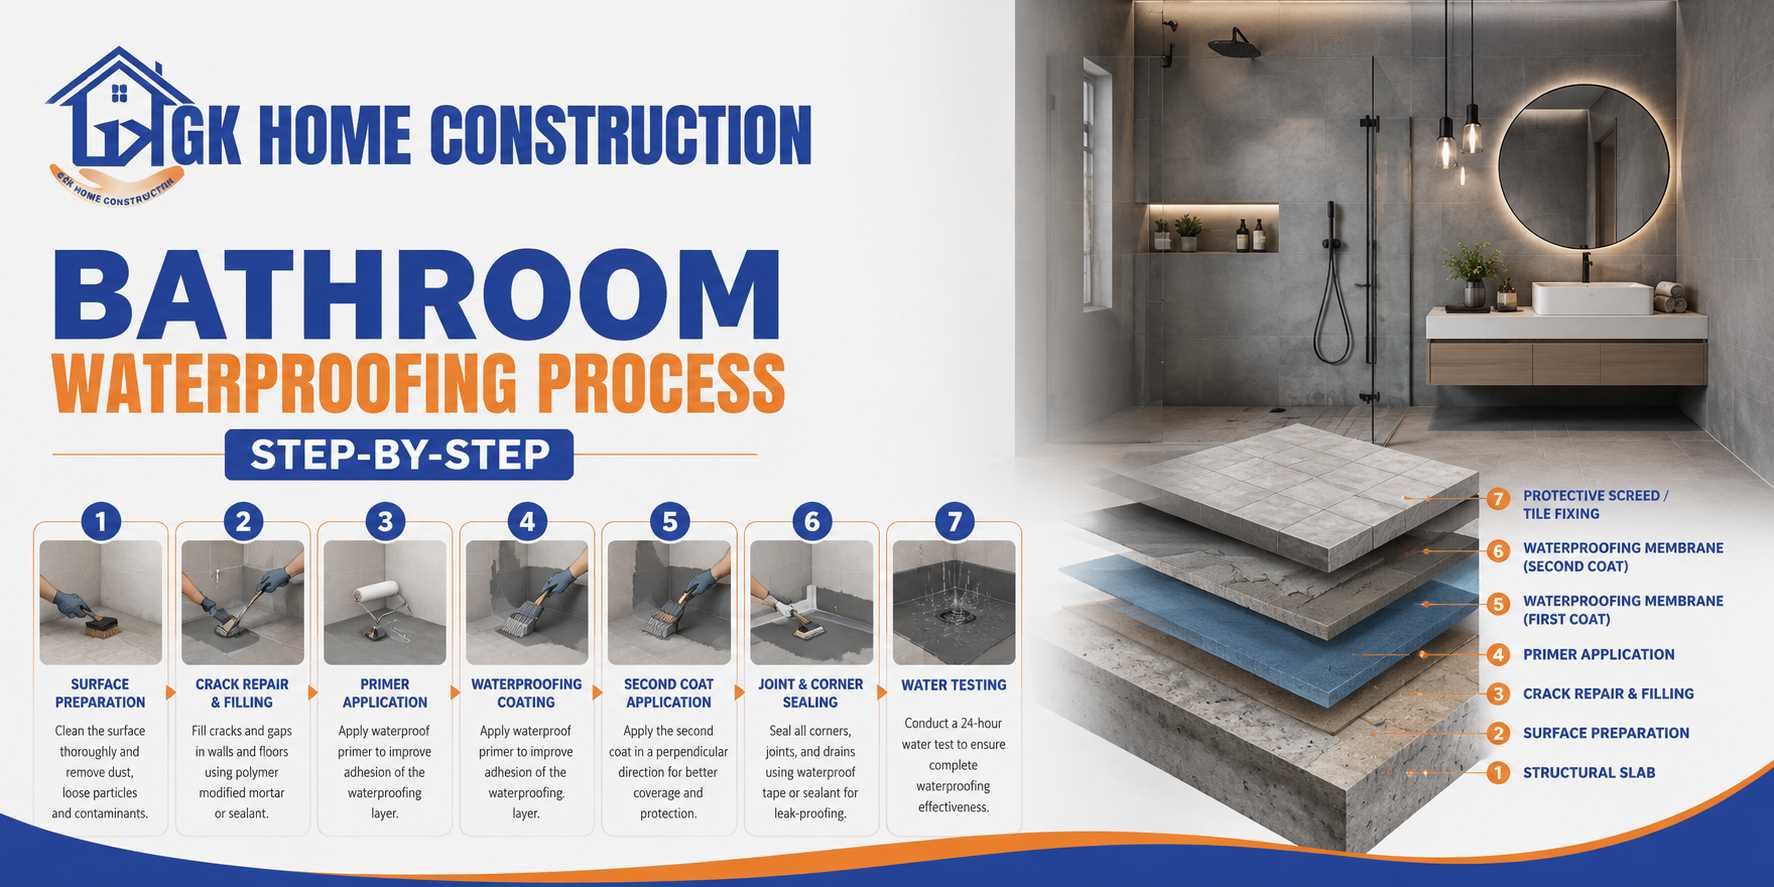
Step 2: Surface Inspection and Preparation
The success of any waterproofing job depends entirely on the quality of surface preparation. This step is where most amateur attempts fail. Begin by thoroughly inspecting the bathroom surfaces — walls, floors, and the junctions between the two. Look for existing cracks, loose tiles, flaking plaster, efflorescence (white salt deposits), and any signs of previous water ingress. All damaged material must be removed completely. Loose tiles should be chipped away, crumbling plaster must be stripped back to the solid substrate, and any cracks wider than a hairline need to be cleaned out before filling. Once all damaged material is removed, clean the surface thoroughly to eliminate dust, grease, oil, and any residue that could prevent the waterproofing membrane from bonding properly. A clean, solid, and dry surface is non-negotiable before any waterproofing product is applied.
Step 3: Repairing Cracks and Filling Gaps
After preparation, every crack, hole, and gap in the substrate must be repaired before waterproofing begins. Use a high-quality cementitious crack filler or flexible polyurethane sealant to fill any visible cracks, especially along floor-to-wall junctions, pipe penetrations, and corners — these are the most vulnerable points where water tends to concentrate and infiltrate. For larger structural cracks, a fibre-reinforced patching mortar is ideal. Pay close attention to areas around drain outlets, taps, and plumbing fixtures, as these penetrations are common entry points for water if not sealed correctly. Allow all repair materials to cure fully according to the manufacturer's specifications before proceeding. Rushing this stage can lead to the waterproofing membrane bridging an unfilled crack and eventually splitting, which defeats the entire purpose of the process.
Step 4: Applying the Waterproofing Primer
Once all repairs have cured, a primer coat is applied to the prepared surface. Priming serves two critical purposes — it penetrates the substrate to consolidate loose particles and improve adhesion, and it creates a consistent surface tension that helps the waterproofing membrane bond evenly across the entire area. The type of primer used should be compatible with the waterproofing membrane product you plan to apply. Most professional contractors use a water-based acrylic or epoxy primer depending on the substrate type — concrete, cement render, or fibre-cement sheeting. Apply the primer using a brush or roller, ensuring full coverage without leaving any dry or missed patches. Allow the primer to dry completely, which typically takes between two to four hours under normal conditions, before moving on to the membrane application.
Step 5: Applying the Waterproofing Membrane
This is the most critical stage of the entire waterproofing process. The membrane acts as the primary barrier against water penetration, so it must be applied correctly and uniformly. There are several types of waterproofing membranes available — liquid-applied acrylic membranes, sheet membranes, and cementitious membranes — each suited to different applications. For most residential bathrooms, a liquid-applied acrylic or polyurethane membrane is the most practical and effective choice.
Apply the first coat to the floor and walls, paying special attention to corners, junctions, and around all penetrations. Embed a fibreglass reinforcement mesh into the wet membrane at all internal corners and around pipe protrusions to provide additional flexibility and crack resistance. Allow the first coat to dry, then apply a second coat in the perpendicular direction to the first to ensure complete and even coverage. Most manufacturers recommend a minimum dry film thickness of 1.0 to 1.5 millimetres for bathroom applications — always check the product data sheet to confirm the correct coverage rate.
Step 6: Water Testing the Membrane
Before tiling or finishing, it is essential to test the waterproofing membrane to confirm its integrity. Plug the floor drain using an appropriate stopper and fill the floor area with water to a minimum depth of 25 millimetres. Allow the water to stand for a minimum of 24 hours, then inspect the ceiling or walls below the bathroom for any signs of moisture or dampness. This flood test reveals any pinholes, thin spots, or unsealed areas that could lead to water ingress over time. If leaks are detected during the flood test, the affected areas must be dried, repaired with additional membrane, and retested before proceeding. Never skip the water test — it is a simple but vital quality check that confirms your waterproofing investment will actually perform as expected.
Step 7: Tiling and Final Finishing
Once the membrane has passed the water test and fully cured, the bathroom is ready for tiling. Use a tile adhesive that is compatible with the waterproofing membrane — your membrane manufacturer will typically specify which adhesives are suitable. Apply tiles using the correct notched trowel size for the tile format you are using, ensuring full back-buttering for large-format tiles. When grouting, use a polymer-modified, water-resistant grout to further enhance the moisture resistance of the finished surface. Silicone sealant should be used at all movement joints, floor-to-wall junctions, and around fixtures and fittings — never use grout in these locations, as grout is rigid and will crack as the building naturally moves. Finally, reseal around all plumbing fixtures and sanitary ware with a high-quality sanitary-grade silicone that contains mould inhibitors.
Building Right from the Start
Bathroom waterproofing is not a step that can be rushed, skipped, or treated as optional. It is the single most important investment you can make in protecting the longevity of your bathroom and the structural health of your home. Every step in this process — from thorough surface preparation and careful crack repair, to proper membrane application, rigorous water testing, and quality finishing — plays an essential role in delivering a result that will stand up to years of daily use without failure. At GK Home Construction, we follow this exact process on every bathroom project we undertake, because we understand that true quality is built from the inside out. When your waterproofing is done right, everything else lasts longer, looks better, and gives you complete peace of mind for years to come.