Waterproofing Process Explained: Step-by-Step Guide
Waterproofing is one of the most important stages of residential construction and home maintenance. A properly planned waterproofing system protects the building from water seepage, dampness, mold growth, concrete deterioration, and structural damage. In areas such as Bangalore, where seasonal rainfall and moisture can put additional pressure on roofs, terraces, bathrooms, basements, and exterior walls, choosing the right waterproofing method and following the correct application process is essential.
This step-by-step waterproofing process explains how professional waterproofing work is generally planned and executed, from surface inspection to final testing.
1. Inspect the Area and Identify the Source of Water
The first step in waterproofing is identifying where moisture is entering the building. Simply applying a waterproof coating over a damp surface may provide only a temporary solution.
Professionals inspect the affected area for:
- Water seepage and damp patches
- Cracks in concrete or plaster
- Ponding water
- Damaged joints
- Leakage around pipes and drains
- Terrace and roof slab defects
- Bathroom floor and wall leakage
- Basement moisture
- Exterior wall cracks
2. Select the Right Waterproofing Method
Different parts of a building require different waterproofing systems. Common options include cementitious waterproofing, polyurethane waterproofing, liquid-applied coatings, crystalline waterproofing, bituminous membranes, and protective exterior coatings.
For example, bathrooms may require cementitious or liquid waterproofing, while exposed terraces may require a suitable membrane or liquid-applied system.
The choice should consider the surface condition, water exposure, movement, weather conditions, expected durability, and project requirements.
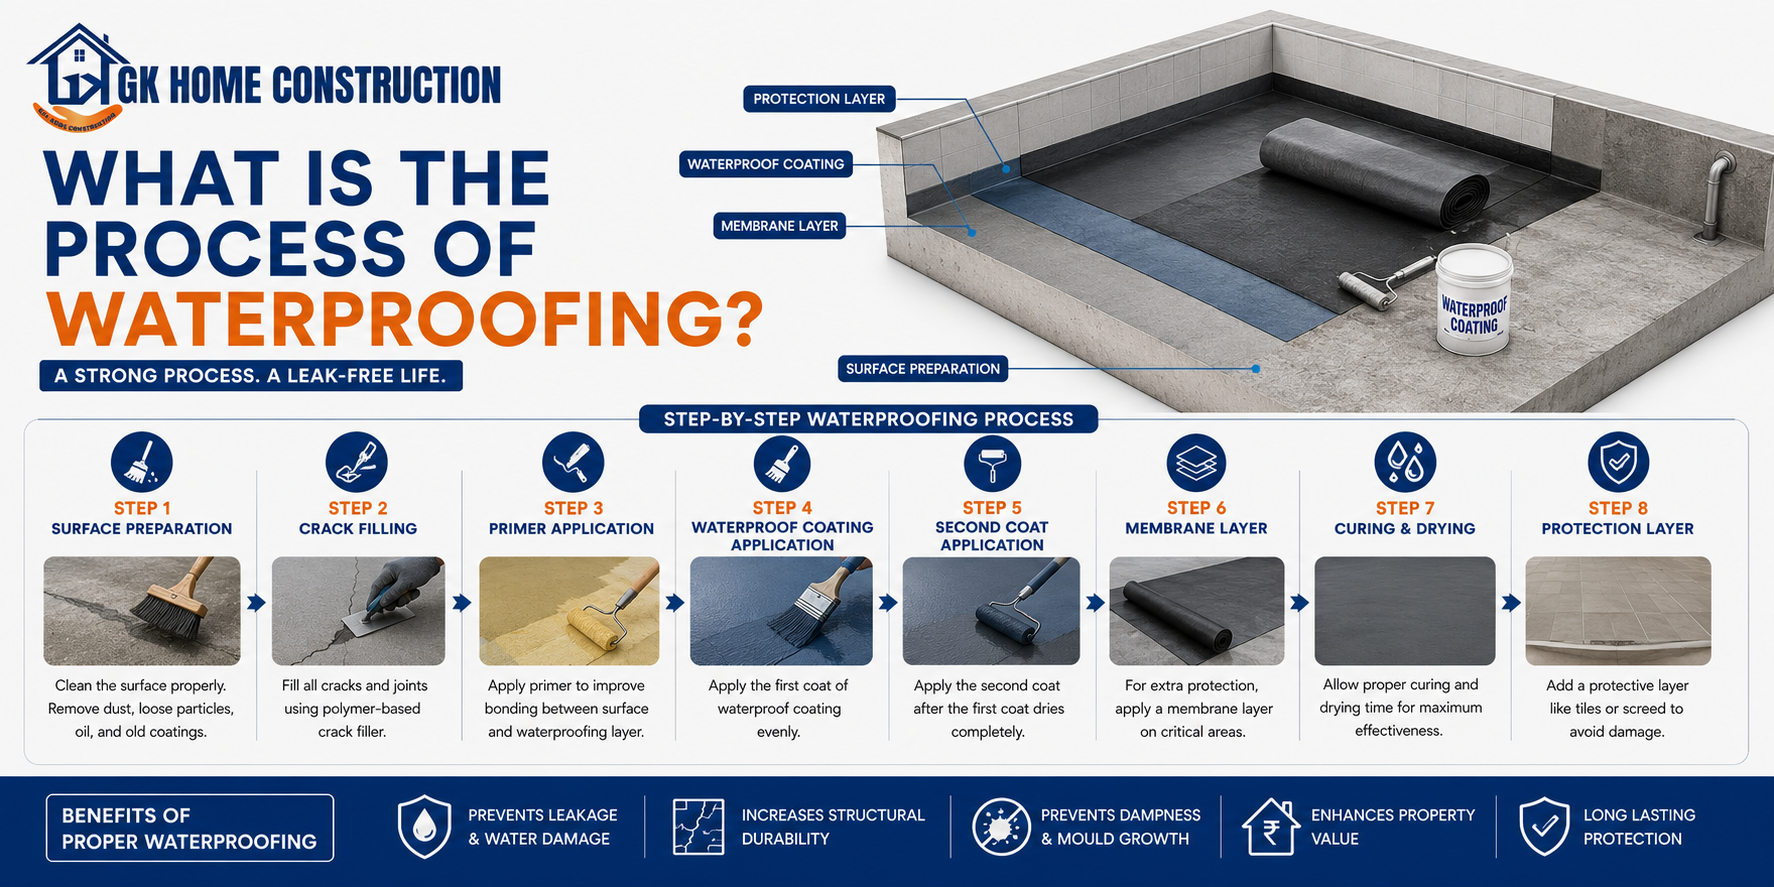
3. Prepare and Clean the Surface
Surface preparation is one of the most important steps in the waterproofing process.
The area should be cleaned thoroughly to remove:
- Dust
- Dirt
- Loose concrete
- Existing damaged coatings
- Oil and grease
- Moss and algae
- Loose plaster
- Construction debris
Poor surface preparation can reduce adhesion and cause premature waterproofing failure.
4. Repair Cracks and Surface Defects
Before applying waterproofing material, repair visible cracks, holes, honeycombing, damaged concrete, and weak areas.
Larger cracks may require suitable crack-repair materials or specialized treatment. Construction joints, pipe penetrations, corners, and wall-floor junctions should also receive particular attention because these are common locations for water leakage.
Waterproofing is not a substitute for repairing structural or construction defects.
5. Provide Proper Slope and Drainage
Waterproofing alone cannot solve problems caused by standing water.
Terraces, balconies, bathrooms, and other wet areas should have a slope toward the drainage outlets. Existing ponding areas may need correction before waterproofing begins.
Should be no blocks for drainage outlets in the waterproofing system.
Good drainage + proper waterproofing = better long-term protection.
6. Treat Corners, Joints, and Pipe Penetrations
Corners and service penetrations require special attention because they can become weak points in a waterproofing system.
Depending on the selected system, contractors may use reinforcing mesh, sealants, tapes, fillets, or compatible waterproofing materials around:
- Wall-to-floor joints
- Internal corners
- Expansion or construction joints
- Plumbing pipes
- Drain outlets
- Bathroom fixtures
- Roof penetrations
7. Apply the Primer, If Required
Some waterproofing systems require a primer before the main waterproofing layer.
The primer improves adhesion between the substrate and waterproofing material. However, not every waterproofing product uses the same preparation system.
The surface should meet the required moisture and cleanliness conditions before application.
8. Apply the First Waterproofing Layer
first waterproofing coat will be applied uniformly across the prepared surface.
Depending on the system, waterproofing may be applied using a brush, roller, spray equipment, trowel, or membrane installation technique.
For areas like corners, joints, drains, pipe penetrations, and other vulnerable areas, should be given special attention.
9. Apply Reinforcement Where Required
Certain waterproofing systems require reinforcement at cracks, joints, corners, or across the entire treated area.
Reinforcing fabric or mesh can help accommodate limited movement and strengthen critical sections when used as part of a compatible waterproofing system.
Reinforcement is covered correctly according to the manufacturer's application procedure.
10. Apply the Second or Additional Coats
The first layer should reach the required curing or drying stage before additional coats are applied.
Multiple coats help achieve the specified waterproofing thickness and coverage. The direction of application may change between coats when recommended by the product manufacturer.
Contractors avoid rushing between coats because insufficient curing will affect the performance of the waterproofing system.
11. Allow Proper Curing and Drying
Curing and drying are critical to waterproofing performance.
Different products have different curing requirements. Cement-based systems may require curing, while liquid membranes and other products may require specific drying periods.
During this period, the waterproofed surface is protected from rain, dust, traffic, damage, or premature covering.
Following the manufacturer's recommended curing schedule is essential.
12. Conduct a Waterproofing Test
Once the waterproofing system has sufficiently cured, the area to which the system is applied will be tested.
For wet areas such as bathrooms and terraces, a controlled ponding or water-retention test may be used to identify leakage.
During testing, the signs of moisture in the area below the adjacent spaces are checked.
Any leakage detected during testing should be repaired before proceeding with the next construction layer.
13. Protect the Waterproofing Layer
A waterproofing membrane or coating can be damaged by construction activity, sharp objects, drilling, tile work, or heavy movement.
Therefore, the completed waterproofing should be protected with the appropriate screed, protective layer, tiles, drainage layer, or other specified finish.
Care will be taken while installing plumbing fixtures, tiles, railings, electrical conduits, or other elements over waterproofed surfaces.
14. Carry Out Final Inspection
The final inspection should confirm that:
- The entire specified area has been treated.
- No visible cracks or untreated sections remain.
- Drains are functioning properly.
- Corners and joints have been properly treated.
- Pipe penetrations are sealed.
- Required thickness has been achieved.
- Testing has been completed.
- Protective layers have been installed correctly.
Common Waterproofing Mistakes to Avoid
Even good-quality waterproofing materials can fail when installation is poorly executed. Common mistakes include applying waterproofing over a dirty surface, ignoring cracks, failing to correct ponding water, using incompatible materials, applying insufficient thickness, skipping curing or drying requirements, and damaging the waterproofing during subsequent construction.
Another common mistake is treating the visible leakage point without identifying the actual source of water.
Why Professional Waterproofing Matters
Professional waterproofing involves more than simply applying a coating. It requires proper inspection, surface preparation, material selection, detailing, application, curing, testing, and protection.
For new construction, waterproofing should be planned at appropriate stages for bathrooms, terraces, roofs, foundations, basements, balconies, and other moisture-prone areas. For existing buildings, the source of leakage should be identified before selecting a repair method.
Final Thoughts
A successful waterproofing project depends on following the correct process from beginning to end. Inspection → surface preparation → crack repair → drainage correction → joint treatment → primer → waterproofing coats → curing → testing → protection → final inspection provides a practical framework for quality waterproofing work.