Bathroom Waterproofing Step-by-Step Process
Bathroom waterproofing is an important part of home construction. Since bathrooms are exposed to water every day, proper waterproofing helps prevent leakage, dampness, mould, and damage to walls and ceilings.
If waterproofing is not done properly, water can slowly seep into the floor or walls, causing problems in the bathroom and the room. That is why waterproofing should be done carefully before bathroom tiles are installed.
Here is a simple step-by-step guide to the bathroom waterproofing process.
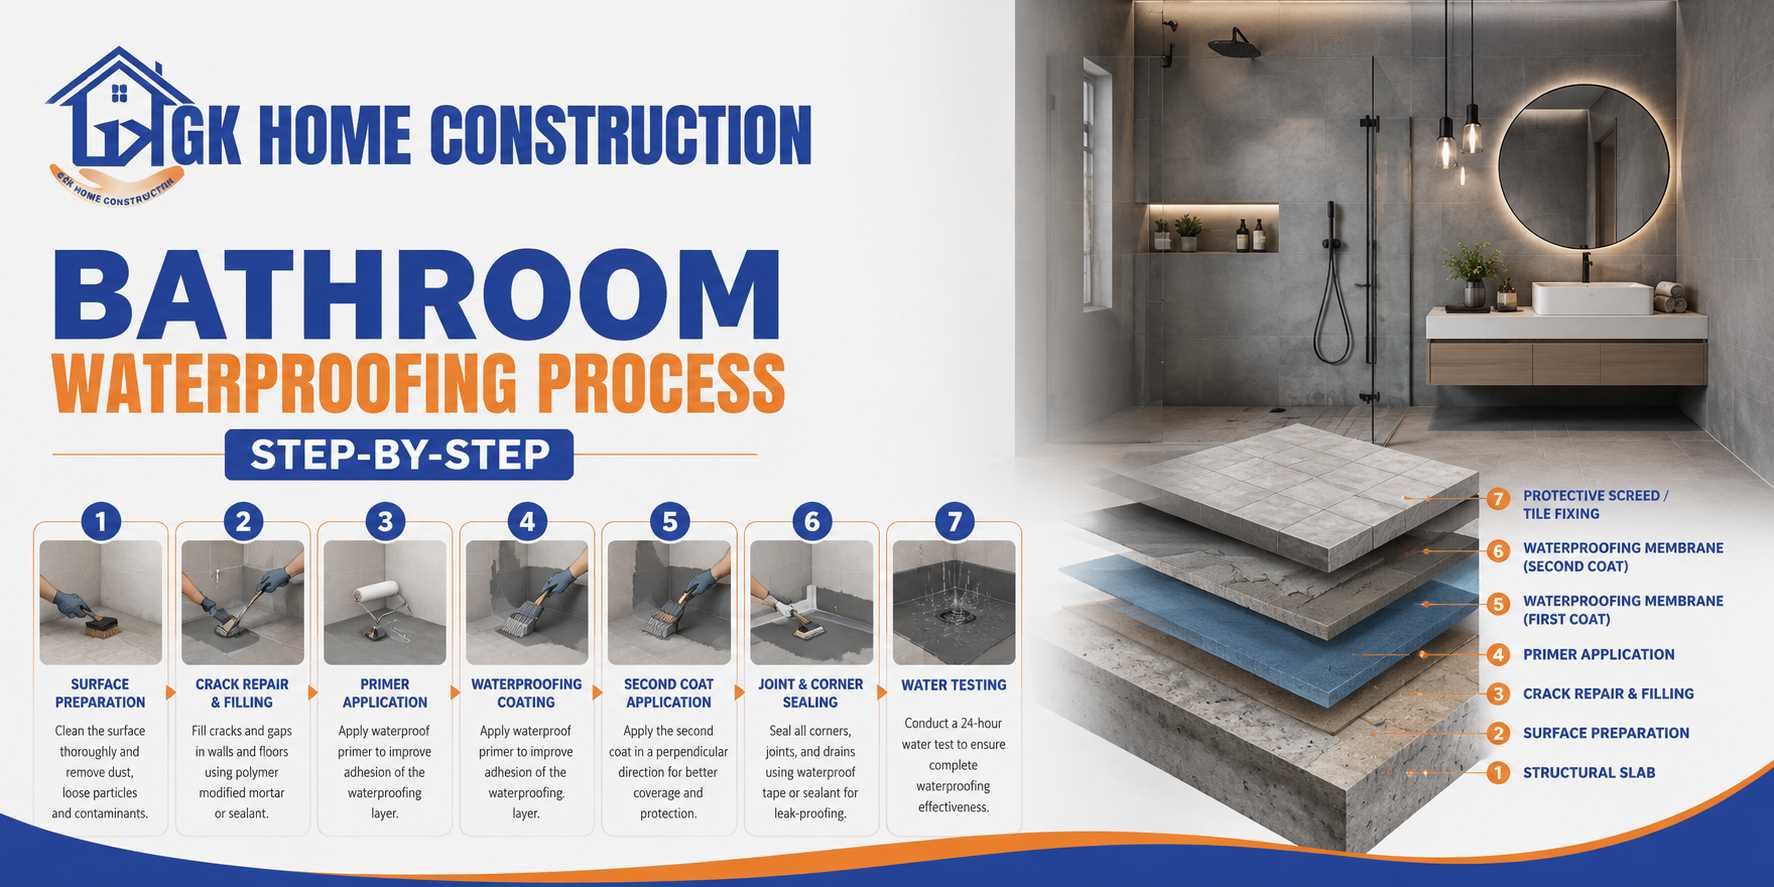
1. Clean and Prepare the Surface
The first step is to clean the bathroom floor and walls. Dust, dirt, loose cement, and other unwanted materials should be removed.
The surface should be strong and smooth before waterproofing starts. The damaged areas should be repaired first.
Good surface preparation helps the waterproofing material stick properly.
2. Check for Cracks
The floor and walls should be checked for cracks and holes.
Small cracks can be repaired easily. Larger cracks may require additional inspection before waterproofing.
Special attention should be given to corners and the joint between the floor and wall; these areas can be more prone to leakage.
3. Protect pipe joints
Bathrooms have many plumbing pipes passing through the floor and walls.
The gaps around these pipes should be properly sealed. If they are left open, water can enter through the gaps and get into the concrete.
Drain outlets and other plumbing openings should also be treated carefully.
4. Apply Waterproofing Material
After the surface is prepared, the waterproofing material is applied.
Many waterproofing products are available, such as cement-based waterproofing systems, liquid waterproofing coatings, and membrane systems.
The correct product depends on the surface, construction requirements, and manufacturer’s recommendations.
The waterproofing material is normally applied over the bathroom floor and selected wall areas, especially the shower area.
5. Take Care of Corner Areas
Corners are important areas during waterproofing.
The wall-floor joint and other corners should be properly treated so that there are no gaps in the waterproofing layer.
Depending on the waterproofing system, reinforcement tape, mesh, sealant, or other detailing materials may be used.
6. Apply the Required Coats
Many waterproofing products require more than one coat.
The first coat should be allowed to dry as recommended by the manufacturer before applying the next coat.
The final surface should have continuous coverage without visible gaps.
7. Allow the Waterproofing to Cure
After applying the waterproofing material, it needs sufficient time to dry or cure.
The bathroom should not be immediately tiled or subjected to heavy work if the waterproofing requires additional curing time.
Following the manufacturer’s instructions at this stage is important for good performance.
8. Conduct a Water Test
A water test is one of the most important steps in bathroom waterproofing.
The drain is temporarily closed, and water is retained on the bathroom floor for the required testing period. The area below the bathroom is checked for signs of leakage.
If leakage is found, the problem should be repaired and the test repeated.
Testing before tiling helps identify waterproofing problems while they can still be corrected easily.
9. Check the Floor Slope
The bathroom floor should have a proper slope towards the drain.
This allows water to flow into the drain and not remain on the floor.
A poor slope can result in standing water and create maintenance and moisture problems.
10. Install Tiles
After the waterproofing has been tested and approved, bathroom tiles can be installed.
Care should be taken during tile installation because drilling, cutting, or other work can damage the waterproofing layer.
Tile joints should also be properly finished with suitable grout or sealant.
Common Bathroom Waterproofing Mistakes
Some common mistakes should be avoided during bathroom waterproofing:
- Applying waterproofing over a dirty surface
- Ignoring cracks
- Leaving gaps around pipes
- Not treating corners properly.
- Applying fewer coats than required
- Not allowing sufficient curing time.
- Skipping the water test
- Creating an incorrect floor slope
- Damaging the waterproofing during tile installation
Why Professional Waterproofing Is Important
Bathroom waterproofing is simple, but small mistakes cause leakage after the bathroom is completed. Finding and repairing leakage after tiles are installed can be more difficult and expensive.
Professional construction teams can properly prepare the surface, apply the waterproofing system, seal vulnerable areas, check drainage, and conduct testing before finishing the bathroom.
Bathroom Waterproofing by GK Home Construction
At GK Home Construction, we understand the importance of proper waterproofing in residential construction. Our construction process focuses on preparing the surface correctly, treating plumbing points and corners, applying suitable waterproofing materials, and checking the work before final finishing.
Whether you are constructing a new house or renovating an existing bathroom, proper waterproofing can help protect your home from water leakage and moisture-related problems.
Conclusion
Bathroom waterproofing is an important step in building a durable home. The basic process includes surface preparation, crack repair, pipe sealing, waterproofing application, curing, water testing, checking the floor slope, and finally installing tiles.
Proper waterproofing can protect your bathroom from leakage and reduce the need for costly repairs.
If you are building or renovating a home in Bangalore, waterproofing can help to prevent moisture problems in future.
GK Home Construction : + 91 9538999535